Search Google and/or this blog

Tuesday, April 21, 2009

Adding Stumble upon, digg it, facebook bookmarks

Stumble del.icio.us Reddit MyWeb! Facebook Google bookmark

These days, the age is that of driving traffic to your blog. An easy way to promote your blog is to have the ability of allowing the users to bookmark your blog on some bookmark sites like stumbleupon.com, digg.com, facebook.com, reddit.com etc. Here is how you can add the bookmark toolbar at the top of every new blog you write. So, if a reader liked your blog, he/she can bookmark it on one/more of these sites. Here is how to add this toolbar ...


  1. Go to blogger Dashboard. (http://www.blogger.com/home)
  2. Click "Edit Layout" for your blog which you want to have this toolbar.
  3. When you are on Layout page ("Page Elements") page, click "Edit HTML".
  4. On "Edit Template" page, check the "" checkbox.
  5. Now copy all the contents from the lower text box onto notepad.
  6. Look for (Ctrl+F) < class='post-header-line-1'/> or <div class='post-body entry-content'>
  7. Between <div class='post-body entry-content'> and end of div (</div> which will be just before < class='post-footer'> , add the following :


    <a expr:href='"http://www.stumbleupon.com/submit?url=" + data:post.url + "&title=" + data:post.title' target='"_stumble"'>
    <img src='https://blogger.googleusercontent.com/img/b/R29vZ2xl/AVvXsEgnjtdomAZcq1Z5xOmLiiWBePR9lxm-G6Sh4DIGB7hSUGpz1a0E7NSC6qS0AUZgTi8F_6rkdl9PWCtJlTCvJlgSd686gNQ4AXnB7g5KOfzyEnyrMgg33gykmqH-xVflrAfCgp2ePzGYvAg/s320/stumb.gif' style='padding: 0px; border:0px solid black;'/>Stumble</a>
    <a expr:href='"http://digg.com/submit?url=" + data:post.url + "&title=" + data:post.title' target='"_digg"'>
    <img src='https://blogger.googleusercontent.com/img/b/R29vZ2xl/AVvXsEjTJW-baqoZhRAXS3VtGfL2VUuve60VGeVZojKCaJZ7f-srlpgFVk5kUolMeWDDsRrEaxOjuXTJ27JZMD9EokdlZWIQd_5n9dUYVevZd5c-q4HQw0cFjilD3aKGC5kGsWaEfjmpT5X2gXo/s320/digg.gif' style='padding: 0px; border:0px solid black;'/>
    <img src='http://digg.com/img/digg-it-tiny.gif' style='padding: 0px; border:0px solid black;'/></a>
    <a expr:href='"http://del.icio.us/post?url=" + data:post.url + "&title=" + data:post.title' target='"_delicious"'>
    <img src='https://blogger.googleusercontent.com/img/b/R29vZ2xl/AVvXsEgv5YwLuYj4mC7I4zPmqKqHFaq1bg_NE6N6t-_x-JD0keaoxTbIsRtKSzvUwIMZ1W93gnBvDs3B16nrnKEJ8e9aQBCV4rMBbNAJDp4o1iy7HJkw0_kVb4s7GBrz0GqvIUAhDD7WATXuv6I/s320/del.jpg' style='padding: 0px; border:0px solid black;'/>del.icio.us</a>
    <a expr:href='"http://reddit.com/submit?url=" + data:post.url + "&title=" + data:post.title' target='"_reddit"'>
    <img src='https://blogger.googleusercontent.com/img/b/R29vZ2xl/AVvXsEi9mlJoDO4VmGC4wt0jR5Td6r8WsBdhbZu6KrY5IObMCr58Ur4y55aBfHltpLhgKOwLUEnEIWQAkXDCgFdmi74rx8Az7Qhud9hxb4fWLgzmhLlmdPze2dd2OiWWFqnjUVUwS-gUdU3qyyM/s320/reddit.gif' style='padding: 0px; border:0px solid black;'/>Reddit</a>
    <a expr:href='"http://myweb2.search.yahoo.com/myresults/bookmarklet?u=" + data:post.url + "&t=" + data:post.title' target='"_myweb"'>
    <img src='https://blogger.googleusercontent.com/img/b/R29vZ2xl/AVvXsEg_mCBUZ2IM4F34-xLnrCg6moNNAgntaWiAkQboGo9AkKpxD6iOzHM6-rKBIvW69qszq0zJWQJr7D14sZ-8LyGiQd7WVwFTv2TJArmE0HWw6uV5YfQx7BOIV-aC3zPp4zjAzb1tzcN3Y28/s320/myWeb.gif' style='padding: 0px; border:0px solid black;'/>MyWeb!</a>
    <a expr:href='"http://www.facebook.com/sharer.php?u=" + data:post.url + "&t=" + data:post.title' target='"_facebook"'>
    <img src='https://blogger.googleusercontent.com/img/b/R29vZ2xl/AVvXsEhDmC4r-Qw352KPkvUhj10ZgHO3VlImLCm16LSgGksGusGCbTr2BEATyjJwKO4xRYYSWRlJdZ-R4LfKh5ON69Iv30XFxqawQ_val1KHZsQQT6ZA-jj_HzKqz2WPmI-46qM7-qRoXi_TNv4/s320/facebook.gif' style='padding: 0px; border:0px solid black;'/>Facebook</a>
    <a expr:href='"http://www.google.com/bookmarks/mark?op=edit&bkmk=" + data:post.url + "&t=" + data:post.title' target='"_facebook"'>
    <img src='https://blogger.googleusercontent.com/img/b/R29vZ2xl/AVvXsEi_7yKd-eOJZs2eMJdKJOplPoixNHoo7uBB-tHKNRqEeeop0uBDJisuaqQ0PpVU-eXzRZM_mfK0wZtgr8V7bPy2ygxXMJMEsJcANqWu3ABbnyK6iQ0d9W5kLFfMt03sXM565RrKo_lOPUM/s320/bookmark.gif' style='padding: 0px; border:0px solid black;'/>Google bookmark</a>
    <b:if cond='data:blog.pageType == "item"'>
    <style>.fullpost{display:inline;}</style>
    <p><data:post.body/></p>
    <b:else/>
    <style>.fullpost{display:none;}</style>
    <p><data:post.body/></p>
    <a expr:href='data:post.url + "#continue"'>Continue >></a>
    </b:if>
    <div style='clear: both;'/> <!-- clear for photos floats -->


    So that it becomes:


    <div class='post-header-line-1'/>

    <div class='post-body entry-content'>
    <a expr:href='"http://www.stumbleupon.com/submit?url=" + data:post.url + "&title=" + data:post.title' target='"_stumble"'>
    <img src='https://blogger.googleusercontent.com/img/b/R29vZ2xl/AVvXsEgnjtdomAZcq1Z5xOmLiiWBePR9lxm-G6Sh4DIGB7hSUGpz1a0E7NSC6qS0AUZgTi8F_6rkdl9PWCtJlTCvJlgSd686gNQ4AXnB7g5KOfzyEnyrMgg33gykmqH-xVflrAfCgp2ePzGYvAg/s320/stumb.gif' style='padding: 0px; border:0px solid black;'/>Stumble</a>
    <a expr:href='"http://digg.com/submit?url=" + data:post.url + "&title=" + data:post.title' target='"_digg"'>
    <img src='https://blogger.googleusercontent.com/img/b/R29vZ2xl/AVvXsEjTJW-baqoZhRAXS3VtGfL2VUuve60VGeVZojKCaJZ7f-srlpgFVk5kUolMeWDDsRrEaxOjuXTJ27JZMD9EokdlZWIQd_5n9dUYVevZd5c-q4HQw0cFjilD3aKGC5kGsWaEfjmpT5X2gXo/s320/digg.gif' style='padding: 0px; border:0px solid black;'/>
    <img src='http://digg.com/img/digg-it-tiny.gif' style='padding: 0px; border:0px solid black;'/></a>
    <a expr:href='"http://del.icio.us/post?url=" + data:post.url + "&title=" + data:post.title' target='"_delicious"'>
    <img src='https://blogger.googleusercontent.com/img/b/R29vZ2xl/AVvXsEgv5YwLuYj4mC7I4zPmqKqHFaq1bg_NE6N6t-_x-JD0keaoxTbIsRtKSzvUwIMZ1W93gnBvDs3B16nrnKEJ8e9aQBCV4rMBbNAJDp4o1iy7HJkw0_kVb4s7GBrz0GqvIUAhDD7WATXuv6I/s320/del.jpg' style='padding: 0px; border:0px solid black;'/>del.icio.us</a>
    <a expr:href='"http://reddit.com/submit?url=" + data:post.url + "&title=" + data:post.title' target='"_reddit"'>
    <img src='https://blogger.googleusercontent.com/img/b/R29vZ2xl/AVvXsEi9mlJoDO4VmGC4wt0jR5Td6r8WsBdhbZu6KrY5IObMCr58Ur4y55aBfHltpLhgKOwLUEnEIWQAkXDCgFdmi74rx8Az7Qhud9hxb4fWLgzmhLlmdPze2dd2OiWWFqnjUVUwS-gUdU3qyyM/s320/reddit.gif' style='padding: 0px; border:0px solid black;'/>Reddit</a>
    <a expr:href='"http://myweb2.search.yahoo.com/myresults/bookmarklet?u=" + data:post.url + "&t=" + data:post.title' target='"_myweb"'>
    <img src='https://blogger.googleusercontent.com/img/b/R29vZ2xl/AVvXsEg_mCBUZ2IM4F34-xLnrCg6moNNAgntaWiAkQboGo9AkKpxD6iOzHM6-rKBIvW69qszq0zJWQJr7D14sZ-8LyGiQd7WVwFTv2TJArmE0HWw6uV5YfQx7BOIV-aC3zPp4zjAzb1tzcN3Y28/s320/myWeb.gif' style='padding: 0px; border:0px solid black;'/>MyWeb!</a>
    <a expr:href='"http://www.facebook.com/sharer.php?u=" + data:post.url + "&t=" + data:post.title' target='"_facebook"'>
    <img src='https://blogger.googleusercontent.com/img/b/R29vZ2xl/AVvXsEhDmC4r-Qw352KPkvUhj10ZgHO3VlImLCm16LSgGksGusGCbTr2BEATyjJwKO4xRYYSWRlJdZ-R4LfKh5ON69Iv30XFxqawQ_val1KHZsQQT6ZA-jj_HzKqz2WPmI-46qM7-qRoXi_TNv4/s320/facebook.gif' style='padding: 0px; border:0px solid black;'/>Facebook</a>
    <a expr:href='"http://www.google.com/bookmarks/mark?op=edit&bkmk=" + data:post.url + "&t=" + data:post.title' target='"_facebook"'>
    <img src='https://blogger.googleusercontent.com/img/b/R29vZ2xl/AVvXsEi_7yKd-eOJZs2eMJdKJOplPoixNHoo7uBB-tHKNRqEeeop0uBDJisuaqQ0PpVU-eXzRZM_mfK0wZtgr8V7bPy2ygxXMJMEsJcANqWu3ABbnyK6iQ0d9W5kLFfMt03sXM565RrKo_lOPUM/s320/bookmark.gif' style='padding: 0px; border:0px solid black;'/>Google bookmark</a>
    <b:if cond='data:blog.pageType == "item"'>
    <style>.fullpost{display:inline;}</style>
    <p><data:post.body/></p>
    <b:else/>
    <style>.fullpost{display:none;}</style>
    <p><data:post.body/></p>
    <a expr:href='data:post.url + "#continue"'>Continue >></a>
    </b:if>
    <div style='clear: both;'/> <!-- clear for photos floats -->
    </div>

    <div class='post-footer'> .... etc ..etc ...


Copy everything and paste it into the "Edit HTML" text box that you had opened earlier. Save it and you will be all set.Good luck and Enjoy !!!
Continue >>

Addinng Adsense : Getting paid for your blogging capabilities :)

Stumble del.icio.us Reddit MyWeb! Facebook Google bookmark

In this blog I'll walk you through the steps on how to monetize your blog meaning how to ask Google to help you monetarily for being a good blogger.
Here is how ...

  1. Login to your blogger account by going to http://blogger.com/start.
  2. Goto dashboard : http://www.blogger.com/home.
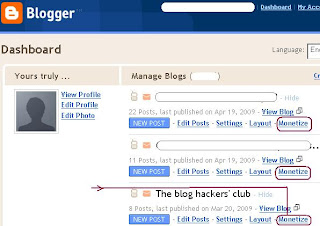
  3. Now if you have multiple blogs, you will see a list of blogs on your dashboard. If you have just one, that blog will be listed. For the blog which you want monetized, click on Monetize link as shown here in the picture:
  4. The wizard will take you through a number of steps. Follow the steps. It's pretty easy. If you already have a Gmail/Google account, you will be all set in a few seconds. If you do not have a Gmail account yet, it might take upto 2-3 days to activate your Google Adsense account. So wait until then.
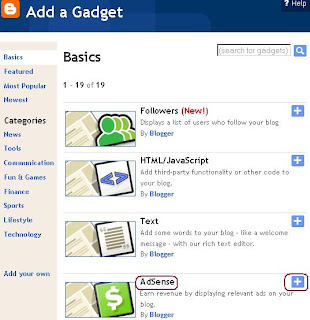
  5. As soon as your account is activated (for Gmail account holders, this will be immediate), goto the dashboard again (see link in step 2). Now hit Layout . It will take you Layout page. By default, "Page Elements" tab is selected. If you are comfortable with html programming, you may like to go ahead and click "Edit HTML" at the top. But for all practical purposes, yu can do well on this "Page Elements" tab. So stay here, and click on "Add a Gadget".
  6. From the pop-up window select "Adsense".
  7. You should be on "Configure Adsense" page now.
  8. Choose the format (shape and size). I suggest not to change the default colors. Select Blend Template from colors drop down. This makes the advertisements mix well with the content.
  9. Hit save.
  10. Again Hit Save on the Layout Page.
  11. You are all set. you should see advertisements appearing on your blog now. :)
  12. You may also like to read through my other blogs on how to add blogger search box and how to add Google Search Box.
  13. Keep in mind that Search options are far better than any link advertisements.


Continue >>

Friday, March 20, 2009

Adding IM Hyperlinks to a Web Site (Msn,Yahoo,Aim,Google Talk,Skype)

Stumble del.icio.us Reddit MyWeb! Facebook Google bookmark

If you have a site, a forum or a blog and want your users to contact you any time via your site?
Here’s how you do it. You can place links with which your users can contact at any time on MSN, Googletalk, Aim, Yahoo and Skype. Also included other instant messaging commands.

Use the below html codes in your site to add various messenger functions:


Interact via Yahoo messenger

Replace USERNAME with yourID@yahoo.com

<a href=”ymsgr:sendIM?USERNAME”>Contact me via yahoo</a>

<a href=”ymsgr:addfriend?USERNAME”>Add me to buddy list</a>

<a href=”ymsgr:sendIM?USERNAME&m=YOUR+MESSAGE”>Send me an IM</a>

<a href=”ymsgr:call?USERNAME”>Call Me</a>
If you want your online status shown in the form of images. You can use one of the images in this way :

<a href=”ymsgr:sendIM?USERNAME”><img src="http://opi.yahoo.com/online?u=USERNAME&m=g&<span style="font-weight:bold;">t=1</span>&l=us" title="Am I online?" /></a>
the <span style="font-weight:bold;">t=1</span> shows the images type. You can change it to 0, 2, 3,4 etc.


Interact via Msn

Replace USERNAME with yourID@hotmail.com

<a href=”msnim:chat?contact=USERNAME”>Chat with me</a>

<a href=”msnim:add?contact=USERNAME”>Add me to your contact list!</a>

<a href=”msnim:voice?contact=USERNAME”>Voice chat with me</a>

<a href=”msnim:video?contact=USERNAME”>Video conversation with me</a>


Interact via Aim

Replace USERNAME with AOL “screenname”

<a href=”aim:goIM?screenname=USERNAME”>Contact me via aim</a>

Open new IM window with a screen name and a message
<a href=”aim:goim?screenname=USERNAME&message=MESSAGE”>Chat in aim</a>

Grabs shared files from a screen name
<a href=”aim:getfile?screenname=USERNAME”>Get Shared Files</a>

Opens a chat room
<a href=”aim:gochat?roomname=CHATROOMNAME”>Go to chat room</a>

Automatically adds screen name to the “Add Buddy” window
<a href=”aim:addbuddy?screenname=USERNAME”>Auto add buddy</a>

Automatically adds screen name and group name to the “Add Buddy” window
<a href=”aim:addbuddy?screenname=USERNAME&groupname=GROUPNAME”>Auto add Screen name and Group name</a>


Interact via GoogleTalk ()

Replace USERNAME with yourID@gmail.com

<a href=”gtalk:chat?jid=USERNAME”>Contact me via Google Talk</a>

<a href=”gtalk:call?jid=USERNAME”>Voice Chat with me</a>


Interact via Skype()

Replace USERNAME with your Skype user ID

<a href=”skype:USERNAME?chat”>Contact me via Skype</a>

<a href=”skype:USERNAME?voicemail”>Leave voicemail</a>

<a href=”skype:USERNAME?userinfo”>View Profile</a>

<a href=”skype:USERNAME?add”>Add 2 Contact List</a>


If you find an error for example while using gtalk in firefox, see this link.

Continue >>

Sunday, March 15, 2009

Set Blog/Article Title as Page Title

Stumble del.icio.us Reddit MyWeb! Facebook Google bookmark

To save yourself some effort and to enhance the search engine ranking (:D), one should help create the page titles in such a way that it is most relevant to what the blog/article talks about. This means you should have a way or have control over how the page title is displayed when you open up a new article or new blog on a blogsite. On a blog like blogger.com, it's easy to do. Here is how you can achieve this :
[YOU ARE ADVISED TO "DOWNLOAD FULL TEMPLATE" BEFORE YOU MESS WITH ANYTHING.]

  1. Go to Dashboard -> Layout ->Edit HTML
  2. Locate the <head> just around the top portion in the textbox.
  3. Just a few lines below <head> , replace <title><data:blog.pagetitle/></title> with the following:


  4. <b:if cond='data:blog.pageType == "item"'>
    <title>
    <data:blog.pageName/> | <data:blog.title/>
    </title>
    <b:else/>
    <title><data:blog.pageTitle/></title>
    </b:if>


  5. Hit save and you are done!!!
  6. Now, if you are interested in how it's done Here you go.
  7. The code above simply says that if the pagetype is an article, meaning someone has opened a page to view one full article, then the title should be page name (article title in case of blogger) separated by a pipe character and then blog title (your blog name) otherwise, the title should just be your page title (which by default will be your blog title).

Continue >>

Creating "Search This Blog" or Blogger Search box

Stumble del.icio.us Reddit MyWeb! Facebook Google bookmark

After creating my "Google Search" box, I wanted to have a search box completely dedicated to searching my current blog. Though, I could also have both the searches work together, but I prefer them to be separate. For creating the search specific to my current blog, I did not have to do much as I used the same search box that comes with the default blogger navigation bar. Wondering how ?? ... Read on ...

Well, if you just do a right click and view source for your current page you will realize that the navigation bar is an iFrame.
It looks something like this just below the <Body> part in the source code:


<div class='navbar section' id='navbar'><div class='widget Navbar' id='Navbar1'><script type="text/javascript">
function setAttributeOnload(object, attribute, val) {
if(window.addEventListener) {
window.addEventListener("load",
function(){ object[attribute] = val; }, false);
} else {
window.attachEvent('onload', function(){ object[attribute] = val; });
}
}
</script>
<iframe src="http://www.blogger.com/navbar.g?targetBlogID=7763145969073648252&blogName=The+blog+hackers%27+club&publishMode=PUBLISH_MODE_BLOGSPOT&navbarType=BLUE&layoutType=LAYOUTS&homepageUrl=http%3A%2F%2Fblogdesignhack.blogspot.com%2F&searchRoot=http%3A%2F%2Fblogdesignhack.blogspot.com%2Fsearch" marginwidth="0" marginheight="0" scrolling="no" frameborder="0" height="30px" width="100%" id="navbar-iframe" title="Blogger Navigation and Search"></iframe>
<div></div></div></div>


So, I thought why not just take out the search box from this navigation bar and place it in sidebar. That what I exactly did. All you need to do is just copy this part of the code from any of your pages, and follow the following steps:

  1. Go to Layout tab under dashboard for your current blog.
  2. Hit "Add Gadget"
  3. Choose HTML/Javascript.
  4. Paste the copied code into the content box after giving title in title box.
  5. The content box should look something like this :


<div id="navbar" class="navbar section">
<div id="Navbar1" class="widget Navbar">
<script type="text/javascript">
function setAttributeOnload(object, attribute, val) {
if(window.addEventListener) {
window.addEventListener("load",
function(){ object[attribute] = val; }, false);
} else {
window.attachEvent('onload', function(){ object[attribute] = val; });
}
}
</script>

<iframe frameborder="0" title="Blogger Search" marginheight="0" marginwidth="0" height="30px" src="http://www.blogger.com/navbar.g?targetBlogID=7763145969073648252&blogName=The+blog+hackers%27+club&publishMode=PUBLISH_MODE_BLOGSPOT&navbarType=BLACK&layoutType=LAYOUTS&homepageUrl=http%3A%2F%2Fblogdesignhack.blogspot.com%2F&searchRoot=http%3A%2F%2Fblogdesignhack.blogspot.com%2Fsearch" id="navbar-iframeSelf" scrolling="no" width="90%">
</iframe>
</div>
</div>


Just make sure that you change the width to 90% so that none of the other portions appear in sidebar.
Hit save and enjoy!!!

Continue >>

Add a Google Search Box on Your Blog

Stumble del.icio.us Reddit MyWeb! Facebook Google bookmark

Do you want to add a new Google search on your blog? It's pretty simple. Just follow the steps defined here and you will be good.

  1. Go to Google Adsense and then login.
  2. Click on Adsense Setup.
  3. Click on "Adsense for Search".
  4. Click search type "The entire web".
  5. And then just follow the default patterns or whichever colors you like.
  6. At the end of it Google gives you some code. Copy both of them together.
  7. And come back to your blogspot blog.
  8. Now goto dashboard and then hit "Add a gadget".
  9. Select HTML/Javascript in the gadget list.
  10. Add a title "Search google" the title text.
  11. Paste the code that you copied in step 6. It should look like this if you copied it correctly

    :<form id="cse-search-box" action="http://myblogname.blogspot.com">
    <div>
    <input value="partner-your-pub-id" name="cx" type="hidden"/>
    <input value="FORID:10" name="cof" type="hidden"/>
    <input value="ISO-8859-1" name="ie" type="hidden"/>
    <input name="q" size="71" type="text"/>
    <input value="Search" name="sa" type="submit"/>
    <a href="http://myblogname.blogspot.com/?q=&sa=Search#1099">Clear Search</a>
    </div>
    </form>
    <script src="http://www.google.com/coop/cse/brand?form=cse-search-box&lang=en" type="text/javascript"></script>
    <div id="cse-search-results"></div>
    <script type="text/javascript">
    var googleSearchIframeName = "cse-search-results";
    var googleSearchFormName = "cse-search-box";
    var googleSearchFrameWidth = 800;
    var googleSearchDomain = "www.google.com";
    var googleSearchPath = "/cse";
    </script>
    <script src="http://www.google.com/afsonline/show_afs_search.js" type="text/javascript"></script>


  12. Hit save and come back to Layout tab.
  13. Now move your gadget to the top area or whichever area you want to display.
  14. Hit save and you are done.


If you want to have radio buttons to toggle between searching web or your blog, you can append this code just below the search button code.


<font size="-1">
<br/><input checked value="" name="sitesearch" type="radio"/> Entire Web
<input value="mycomponent.blogspot.com" name="sitesearch" type="radio"/> This Blog <br/>
</font>


Continue >>

Remove / Hide the blogger Navigation Bar

Stumble del.icio.us Reddit MyWeb! Facebook Google bookmark

Well, the next thing I wanted to do in my blogs is hiding the blogger navigation bar. The way blogger has designed all its templates, you are not given an option to hide the navigation bar. So ideally speaking it means they always want you to show the nav bar. But there is a way around ... :). For example you don't see any navigation bar on this blog ..right ??? Ok here you go on how to do it in few simple steps ...
[YOU ARE ADVISED TO "DOWNLOAD FULL TEMPLATE" BEFORE YOU MESS WITH ANYTHING.]

  1. Go to your dashboard and select "Layout" tab.
  2. Click "Edit Html".
  3. Check the "Expand Widget Templates" checkbox.
  4. Scroll down until you find "#header-wrapper" or better still just copy paste everything from the textbox into a notepad and then do a Ctrl+F for "#header-wrapper".
  5. Copy and Paste the following just below #header-wrapper {width:880px; margin:0 auto 10px; border:1px solid $bordercolor;}

  6. #navbar-iframe { display: none !important; // hide the navigation bar}

  7. This should now look like this:
  8. /* Header
    -----------------------------------------------
    */

    #header-wrapper {
    width:880px;
    margin:0 auto 10px;
    border:1px solid $bordercolor;
    }
    #navbar-iframe {
    display: none !important; // hide the navigation bar
    }


  9. Save settings. and you are done. Enjoy!!
  10. And yeah ! don't worry you can always goto dashboard or in edit mode when you login by going to blogger.com.


If you want to know, how this works ..here it is :
1. Basically, if you right click anywhere on your blog page and take a look at the page source, you will find something like this

<style type="text/css"> #navbar-iframe { display:block }
</style>

</head>
<body>

<div class='navbar section' id='navbar'><div class='widget Navbar' id='Navbar1'><script type="text/javascript">
function setAttributeOnload(object, attribute, val) {
if(window.addEventListener) {
window.addEventListener("load",
function(){ object[attribute] = val; }, false);
} else {
window.attachEvent('onload', function(){ object[attribute] = val; });
}
}
</script>
<iframe src="http://www.blogger.com/navbar.g?targetBlogID=8223219756526365841&blogName=Rants+And+Raves...+aur+Kya+%3F&publishMode=PUBLISH_MODE_BLOGSPOT&navbarType=BLACK&layoutType=LAYOUTS&homepageUrl=http%3A%2F%2Faskjha.blogspot.com%2F&searchRoot=http%3A%2F%2Faskjha.blogspot.com%2Fsearch" marginwidth="0" marginheight="0" scrolling="no" frameborder="0" height="30px" width="100%" id="navbar-iframe" title="Blogger Navigation and Search"></iframe>

......
etc ...
etc..


If you see the frame Id is named as navbar-iframe

Thus if we change the style in CSS (cascading style sheet, which defines how your page should look) and make the display style to "none", the navbar will stop appearing in the page. :) . That's how it works !!!

Continue >>